
WCCRM's robust Quoting functionality allows you to generate Quotes directly on CRM Accounts and send them using several different methods. WCCRM also pulls product information such as inventory and unit cost directly from your ERP ensuring you have the most up-to-date information at hand.
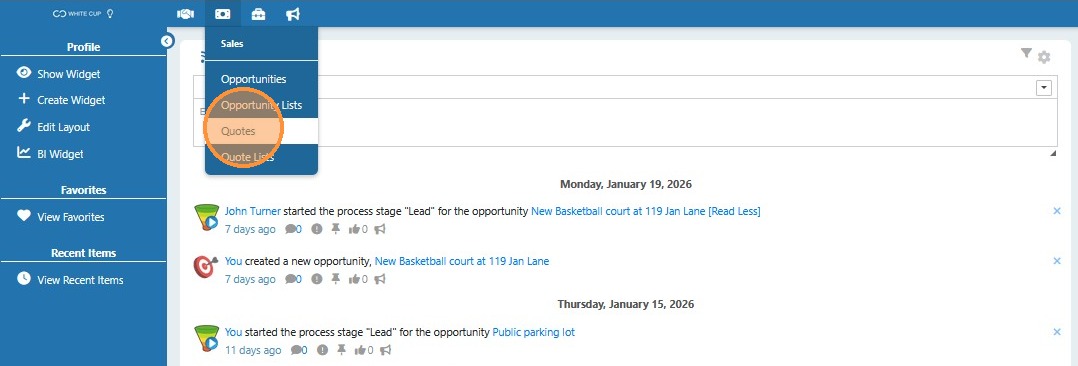
To access the Quotes module and list of quotes, click the Sales (dollar bill icon) menu and select Quotes.
Options for Sending Your Quote
Create Quote
The Create Quote screen allows you to generate quotes using Product information directly from your ERP. Quotes can be assigned to individual users or groups to work from start to finish.
- From the Quotes list screen, select Create Quote in the left side action pane.
- The Create Quote screen appears. Complete the fields within the screen ensuring to assign it to a User or Group and relate it to a Ship To Customer or Contact.
- At the bottom, you can add Products to the quote by selecting Add Products.
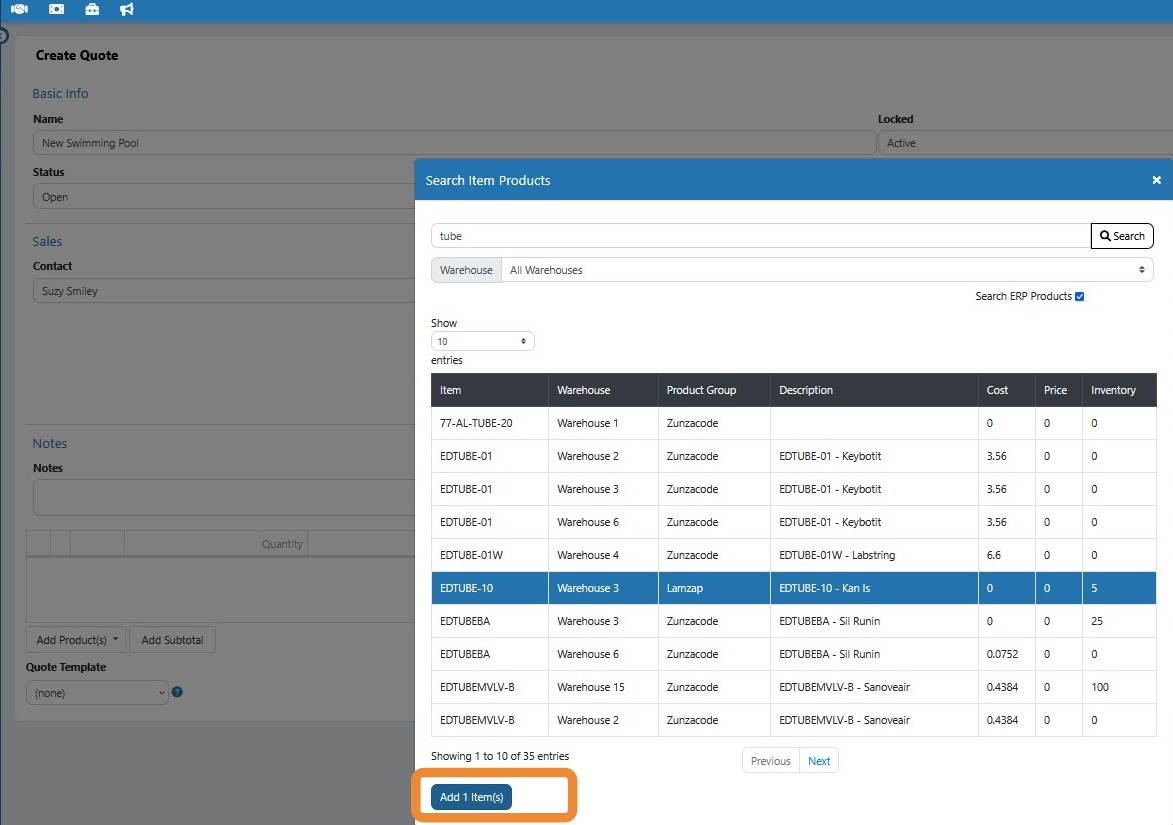
- Selecting Search Products opens up a window that allows you to search for Products that have been pulled directly from your ERP and imported into the WCCRM Products table:
- Select the Products you wish to add, then click Add Items.
- The items are added to the Quotes grid. From here, you can edit the line items by selecting an eligible field to edit on the row (such as Sell Price). You can also reorder the quote lines by clicking and dragging items using the move icon on the left. Use the Trashcan icon to remove a line, or the Comment bubble to add a note on the line (which can be included when generating the quote to send).
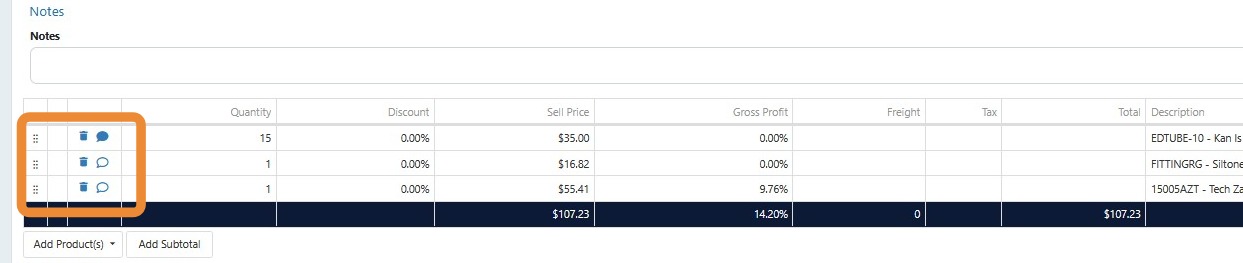
Note: The available fields are determined by the quotes grid layout that administrators can setup.
- You can also add custom products to your quote that do not exist in your Products table. For example, maybe you would like to add a Warehouse Storage fee to the quote. You can do that by selecting Add Products and clicking Add Custom Product.
- The Quoting feature also allows you to Group items together into a Kit. Doing this adds an additional line to the grid that subtotals the line items that are part of the group. You can then edit the subtotal fields as desired including Discount, Sell Price, Gross Profit %, and if it applies Freight and Tax.
- Select Add Subtotal below the list of products.
- Enter in a name for the subtotal and a description. Select Add.
- The grid updates with the new line. Now use the Move icon on the row to include items into the subtotal, which can then be edited as needed.
- After entering all the products and details, select Create at the top of the page to save your quote. This will open the quote to select the options for generating a quote.
Quote Generation Options
When on a saved quote, you will notice a few different configuration options for generating your quote under Quote Generation Options. This section explains what these options do:
-
Subtotal options: When items in a quote are added to a subtotal, options are available for how to display those items.
- Include all information in subtotal: When a subtotal is added to a quote, all individual line item details within the subtotal display when the quote is generated. This includes product information and pricing information.
- Hide subtotal line item details: When a subtotal is added to a quote, all the individual line items within the subtotal are hidden meaning the generated quote only displays the subtotals.
- Hide subtotal line item pricing: When a subtotal is added to a quote, all the pricing information for individual line items are hidden, however product information displays when the quote is generated.
- Include comments on export: Enabling this option includes any comments added to quote lines when the quote is generated.
- Quote Orientation: Determines the layout of the quote when it is generated. The options to choose from are portrait and landscape.
- Quote Paper Size: Determines the size of the paper you would like the quote generated on.
The options you select appear on the Quote Preview. When generating the quote, you will be offered the option to preview a quote prior to generation. The quote format will depend on the quote template setup by your administrators.
If you select Yes to preview, the PDF will appear in a preview window. From there you can continue by selecting Send PDF or Generate PDF (depending on your option) or if you wish to make changes, select Cancel to return to the Quote.
Note: Administrators can also default these options in the Admin menu > Quotes Management section > Quotes Settings option.
Options for Sending Your Quote
Now that you have finished building out your quote, the next step is to generate the quote and send it out to your customer. White Cup CRM provides several efficient ways to do this:
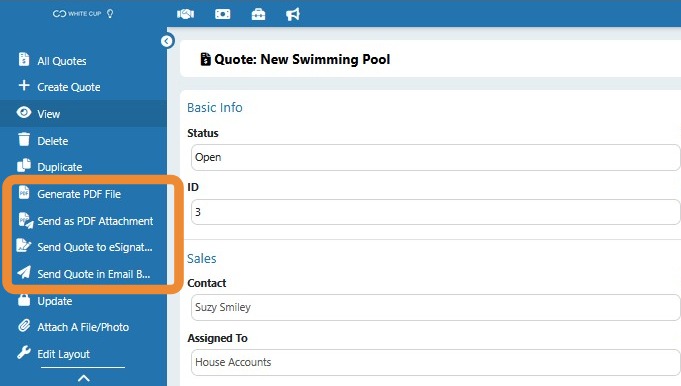
- Generate PDF File: Selecting this option will create the file for use outside of CRM.
-
Send as PDF Attachment: Selecting this option automatically attaches the quote PDF to an email as an attachment for you to send to the associated Contact.
-
Send Quote to eSignature: Selecting this option automatically sends the quote to White Cup CRM's eSignature function. From there you can send the quote out to be signed digitally to the associated contact.
-
Send Quote in Email Body: Selecting this option attaches the quote to the body of an email for you to send to the associated Contact record.
Comments
0 comments
Please sign in to leave a comment.